Setting Up and Working with an Eclipse Project
Excerpted from personal work habits and from how-to books, here’s how to set up and work with a project in Eclipse in one, concise place. Obviously, this was written mostly for me near the beginning of my Eclipse career.
Table of Contents
Introduction
The Eclipse product name is written with ambiguous case. I have chosen upper case, Eclipse, for convenience. From the Linux command line, of course, it is typed:
russ@taliesin:~/dev/DesignPatterns> eclipse
Installing Eclipse and Bibliography
This document assumes you’ve already installed Eclipse. If you can’t figure out how to do that, there are several books that will help you:
Burd, Barry, Eclipse for Dummies, 2005, 346 pages, Wiley Publishing, Inc., New Jersey.
Carlson, David, Eclipse Distilled, 2005, 290 pages, Addison-Wesley, New York.
Note, however, that the version of Eclipse covered by these books, early 3.x, presents a number of cosmetic differences even with version 3.3. I suspect it is going to be challenging to keep pace with Eclipse development in the line of how-to books.
Setting Up a New Eclipse Project
The first step is to launch Eclipse and select a workspace. If you don’t already have one set up, my advice is to think over the following:
- Where would you like to put the root of all your development projects?
- How much over-lap will there be in their design, library-sharing, etc?
I have chosen to juggle several workspaces under one place, on my Linux host, this is
russ@taliesin:~/dev/workspace
Thus, for the Java code I wrote for the exercises from Head First Design Patterns, I created a separate workspace, DesignPatterns. Similar, for exercises from Java Concurrency in Practice, I created Concurrency because I highly doubted that anything from the one workspace would ever find its way into the other. For other, real projects, I create still other names. All of these are under svn control from my Linux server so that I can get to the code from my Linux host at work, another at home and from my Windows workstation at home where the workspace for the second book I mentioned is C:\russ\workspace\Concurreny.
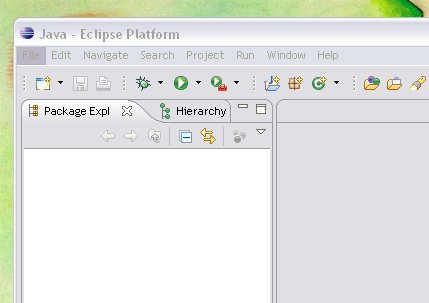
If you haven’t already, launch Eclipse and choose your workspace. Then, choose Window->Open Perspective->Java from the menus.
To the right, above here, is an illustration of my launched Eclipse session, in workspace Concurrency, ready for the creation of the project. We’ll be using the three wizards (iconic buttons) in the center of the little illustration below which are: New Java Project, New Java Package and New Java Class.

Creating a New Project
The following steps will result in a new eclipse project
- Click the New Java Project icon or File->New->Java Project.
- Enter the project name: Exercise0 (see illustration).
- Click Finish.

Your Eclipse Package Explorer view (pane) should appear similar to the illustration at the right here.
Creating a New Package
Next, we’ll create a Java package for our project and also our first class. This will involve opening project hierarchy in the Package Explorer pane expanding out the elements by clicking on the + control. In this illustration, we’ve already clicked on Exercise0 to expand it for the next step.
Choosing a name for your Java package is one where you will need imagination and foresight in order to work around namespace problems. If you are developing code for exercise as I’m doing here, your package name won’t make much difference to anyone except to annoy you if you choose too long a name hierarchically.
By convention in the Java community, however, you are encouraged to name your packages by your domain name and a relevant project, application or utility name. For example, let’s say that I’m developing a set of classes that might become public or, at least, will be public within my legal entity (company). I will want to follow Java conventions by reversing my domain name com.etretatlogiciels. I’ll explain the reversal in a moment. Suffice to say that my company name is Etretat Logiciels, LLC and my domain name etretatlogiciels.com. Importantly,
-
Package naming affects package and import statements in Java class files.
You’ve seen, at the top of any Java class file (source code), package and import lines that say things like
	package com.etretatlogiciels.widget;
	import java.util.Iterator;
If I’m developing useful classes for widgets, I’ll tack appopriate names onto my domain name: com.etretatlogiciels.widget. If anyone else consumes classes from my widget utilities, they might do so thus:
import com.etretatlogiciels.widget.*;
You can easily see the pattern: my package name follows the hierarchy, from general to specific, just as the Java import statement for a Java utility class follows from general to specific. Hence, placing com however peculiarly at the beginning of the package name I choose, followed by my domain name quickly reserves space for my company in the .com namespace whereas if I just called my package widget.util, it might conflict with other companies’ public utility classes for widgets.
In English what you just saw here—and will see at the top of your class files—this says, “This class belongs to com.etretatlogiciels and is part of the widget project of that company.” (widget is going to be the name of my application and this class is devoted exclusively to it) and, “From Java’s utility classes, I’m going to get help from Iterator in implementing my array classes.”
In my case today, however, this is merely for the exercises in Gœtz’ book on Java concurrency, so I’m going to ignore the whole package naming discussion at this point and just use an acronym made from the book title.
- Click on Exercise0.
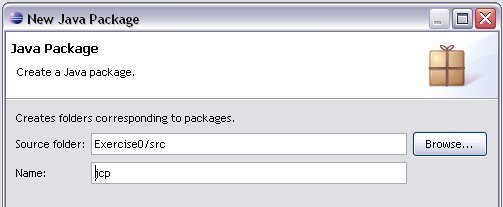
- Click the New Java Package icon. You can also right-click on this icon, then choose New->Package from the pop-up menu.
- Enter the name of the new Java package: jcp.
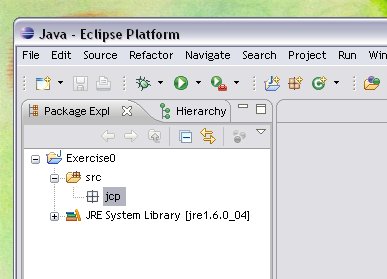
You should now see a package in the project hierarchy (Package Explorer). Next, we’ll create our first class.
Creating a New Class
The Java class file is the file that contains the source code to a class in Java.
- Click on the jcp package in the Package Explorer pane.