Setting up Subversion (svn)
and Making It Work with Apache 2
I wanted to do this originally in order to set up the Java source code to the exercises in Head First Design Patterns. My friend, Scott, helped me considerably. He is a veteran of setting up both Apache and svn.
For purposes of this write-up, my user is gadfly.
Table of Contents
- Setting Up the Server Filesystem
- Getting Data into the Repository
- Failures and Complex Configurations
- Where to Put the <Location /svn> Stanza
- Apache and Symbolic Links
- Importing an Existing Project
- Operations on an Existing Project
- Integrating Subversion and Eclipse
- Appendix A: a Source Code Tree
- Appendix B: Ganymede Update (read this first)
Setting Up the Server Filesystem
I followed the svn doc, http://svnbook.red-bean.com/en/1.4/svn-book.pdf, to set up the repository. First, however, I did a little research on best practice and decided to create a place for repositories to live, /var/opt/svn. As I wanted to put the repositories on a bigger disk, I made svn a link to /home/svn. Then, I began creating the DesignPatterns repository:
	gadfly@windofkeltia:~> sudo bash
	windofkeltia:/home/gadfly:~> cd /var/opt/svn (actually at /home/svn)
	windofkeltia:/home/gadfly:~> svn create DesignPatterns
letting the filesystem backing default to FSFS for reasons easily read in the doc.
Following in “Chapter 5: Creating and Configuring Your Repository,” I looked at hooks thinking that the post commit hook might be a good place to use a Python script to e-mail one or more people that something new was committed to the repository. I set this idea aside for a future time.
Getting Data into the Repository
Then I looked at “Chapter 2: Getting Data into your Repository”” and importing:
gadfly@windofkeltia:~> svn import DesignPatterns file:///var/opt/svn/DesignPatterns
I then went to Yast2 and set up a new group, dev, into which I put gadfly and sfranson and changed the ownership and privileges of the repository directory and subdirectories to accommodate that group.
	gadfly@windofkeltia:~> sudo bash
	windofkeltia:/home/gadfly:~> yast2
I checked out “Chapter 6: httpd, the Apache HTTP Server”" in hopes of getting all of this set up for access remotely. In the end, I had to find and install the web DAV stuff for svn using Apache modules even though both Apache and svn were installed and set up.
In Yast2, Software->SoftwareManagement, I searched for “subversion.” Then I chose to install “subversion-server.”
I turned to my SuSE 10.2 host at work, on which I develop, created a new subdirectory and tried to get what I had committed (imported) and got:
	russ@taliesin:~/play> svn checkout http://www.windofkeltia.com/svn/DesignPatterns
	svn: PROPFIND of '/svn/DesignPatterns': 405 Method Not Allowed (http://www.windofkeltia.com)
Failures and Complex Configurations
There is much to set up still before being able to use any repository. The following discussion is in disarray as would be the description of any complex task for which the existing documentation is over-simplified.
How do I “publish” /var/opt/svn in such a way as to meet the example in the doc:
$ svn checkout http://svn.collab.net/repos/svn/trunk
which for me would be like www.windofkeltia.com/...?
Find the Apache Modules
To use http:// I have to set up the Apache Subversion module as just explained. It “publishes“ the repository under an alias path; something like: http://www.windofkeltia.com/svn/DesignPatterns. I can use the local path for the svn:// protocol. Also, I publish just the top level and later gain access to yet other repositories I create instead of doing it one by one. It's merely a configuration to Apache to include other repositories.
I found the Apache modules on the path /usr/lib/apache2 instead of /usr/local/apache which the svn doc mentioned. After the Yast2 experience related above, I found mod_dav_svn.so on that path.
Add Apache Modules using Yast
Next, I had to add the modules to Apache: in Yast2 I go to System->sysconfig editor, then to Network->WWW->Apache2->APACHE_MODULES each time using the right-arrow key to expand out the + control. Then, I use TAB to reach the one-line editor under Setting of: APACHE_MODULES, press the END key to get to the end and I add: dav and dav_svn to the list of modules.
Setting up Passwords
Passwords must be set up using htpasswd as explained by “Chapter 6: Authentication Options, Basic Apache Configuration,” except that I only found this under htpasswd2.
windofkeltia:/home/gadfly:~> htpasswd -cm /etc/svn-auth-file gadfly
...which creates a file, /etc/svn-auth-file that looks inside a little bit like /etc/passwd (with hashes et al.).
Changes or additions need to be made to a configuration file under a directory like /etc/apache2/conf.d directory, but this proved not to be the case because we're using virtual hosts in Apache. The configuration consists principally of this XML stanza:
	<Location /svn>
	   DAV svn
	   SVNParentPath /var/opt/svn
	   AuthType Basic
	   Server Configuration
	   AuthName "Subversion repository"
	   AuthUserFile /etc/svn-auth-file
	   Require valid-user
	</Location>
By using SVNParentPath in place of SVNPath, it will automatically pick up any newly created repositories. Once these changes have been made, bounce Apache thus:
windofkeltia:/home/gadfly:~> rcapache2 restart
Curses, Foiled Again...
However, none of this worked. Subversion access wasn't working with Apache; indeed, it wasn't working at all, even from the server host.
The svn dæmon works by running as if user svn and the rpm installation didn't set it up, so svn had to be added via Yast2.
It was also discovered that SuSE's sysconfig settings used to launch the dæmon included -R forcing it into the read-only mode. This something that never happened in prior SuSE versions. That removed, svn seemed to work from the host itself.
Then, in imitation of former SuSE versions, the /var/opt link needed to get changed to /srv/svn and the repository recreated under /srv/svn/repos. This puts the served-up svn stuff under /srv along with www (see write-up on Setting Up an Apache 2 (httpd) Web Server).
Despite this, /srv/svn is a link to /home/svn in order to get what can become very large onto the larger disk.
The dæmon is started via:
windofkeltia:/home/gadfly:~> rcsvnserve start
Create the repository by logging in as user svn, and creating thus:
	windofkeltia:/home/gadfly:~> su svn
	svn@windofkeltia:/home/gadfly:~> svnadmin create --fs-type fsfs /srv/svn/repos/DesignPatterns
The --fs-type fsfs is unnecessary as this is the default since Subversion v1.2, but do not use the Berkeley stuff or, by all accounts, you'll be sorry.
Then edit /srv/svn/repos/DesignPatterns/conf/svnserve.conf to un-comment the line to access /etc/passwd. This is the authorization for the svn:// protocol to access the repository and is separate from the Apache htpasswd2 business.
It is necessary to add one's user to /srv/svn/repos/DesignPatterns/conf/passwd using vi.
Next, verify that the repository is working by creating the trunk directory as whatever user (employing the authorization set up in /srv/svn/repos/DesignPatterns/conf/passwd.
Then, ...
svn@windofkeltia:~-> svn mkdir svn://localhost/DesignPatterns/trunk -m "Trunk dir."
If the commit works, we're now at revision 1.
Where to Put the <Location /svn> Stanza
Then, for Apache the <Location /svn> stanza must be moved to the configuration file for the windofkeltia virtual host on the path /etc/apache2/vhosts.d/_windofkeltia.conf. This is so it can be accessed thus: http://www.windofkeltia.com/svn/<repository-name>.
The /etc/apache2/conf.d/subversion.conf approach doesn't work because we are using virtual hosts and that file no longer applies once the server is hit by any address that is a virtual host, in this case, www.windofkeltia.com/svn/... .
So, adding the configuration and restarting apache:
svn@windofkeltia:~-> rcapache2 restart
Scott found that he could then finally browse the repository with TortoiseSVN from his own host with URL http://www.windofkeltia.com/svn/DesignPatterns.
The Apache authorization worked once the user and password were set up via htpasswd2 in the /etc/svn-auth-file as noted much earlier. trunk can be seen under the DesignPatterns repository.
Apache and Symbolic Links
Apache doesn't normally follow symbolic links such as the one made from /srv/svn to /home/svn. However, once the <Location> stanza was added to /etc/apache2/vhost.d/_windofkeltia.conf, plus the following <Directory>, to fix the link-following problem, everything began to work and it was possible to use the svn user to add the branches and tags subdirectories.
	<Directory /srv/svn/repos>
	   Options FollowSymLinks
	   Order deny,allow
	   Deny from all
	</Directory>
From here on, we add a new repository merely by the following commands:
	svn@windofkeltia:~> svnadmin create /srv/svn/repos/<repository-name>
	svn@windofkeltia:~> chmod -R g+w /srv/svn/repos/<repository-name>
Apache should automatically pick up the new repository without need to restart.
Importing an Existing Project
We, on the other hand, aren't going to create the contents of a repository, but import them from existing Java source files we already created using Eclipse. To import our Design Patterns source code, we can do one of the following assuming we're sitting on some path like /home/gadfly/DesignPatterns.
	gadfly@windofkeltia:~/DesignPatterns> svn import . \
		http://localhost/svn/DesignPatterns/trunk -m "Initial import."

	gadfly@windofkeltia:~/DesignPatterns> svn import . \
		svn://localhost/DesignPatterns/trunk -m "Initial import."

	gadfly@windofkeltia:~/DesignPatterns> svn import . \
		file:///srv/svn/repos/DesignPatterns/trunk -m "Initial import."
There are three ways to access the repository, using http, svn and file protocols. http is by virtue of the SVN Apache module; svn by virtue of the running svnserve dæmon process and configuration; and the file protocol by virtual of being local. It probably is not a good idea to use the file protocol. If you haven't got svnserve running, the only way to access the repository is via http even though you are local.
You should probably be consistent and stick with one protocol. If you choose http, there is no other way to specify the URL other than using localhost if you are indeed local.
Operations on an Existing Project
Checking Out an Existing Project
To check out a project from the repository, we assume you're using http (here, we demonstration specifying the username too because otherwise, it defaults to the username on the remote host from which you're doing it which may not be our gadfly user):
	gadfly@windofkeltia:~/dev/DesignPatterns> svn co http://localhost/svn/DesignPatterns
	C:\maximilian\workspace> svn co --username gadfly http://localhost/svn/DesignPatterns
Committing Modifications to an Existing Project
So far, I haven't figured out how to do this using http. I do it from work all the time, but I'm doing it more or less directly (via ssh actually). I'll update this when I figure it out. Meanwhile, the following, obvious command does not work:
gadfly@windofkeltia:~/dev/DesignPatterns> svn commit http://localhost/svn/DesignPatterns/filename
Integrating Subversion and Eclipse
Nota bene: When I wrote this, I had never used Subversion from Eclipse. Now that I have, I know a better, more straightforward way on Linux. There, just set up an area into which to maintain your controlled code. To make Eclipse incorporate this into a project, you have to set the project up specially. To see this done, look at file:///home/russ/GWAVA/gwava-eclipse.html. Obviously, this isn't available from here, but you can contact me to find out the relevant contents (which are a little sensitive).
I have still never used Subversion on Windoz or in Eclipse on Windoz. However, it is a similar process with the repository set up in an essentially Eclipse-foreign directory structure and forcing Eclipse to use that code rather than creating code from scratch.
For now, I'll not delete the following. Here are links for Subversion documentation and for integrating with Eclipse:
- Documentation: choice of single- or multi-page HTML, PDF, etc.
http://svnbook.red-bean.com/- The Subversive plug-in:
http://www.polarion.org/index.php?page=download&project=subversive- Eclipse documentation (referred to from the previous page) for installing and/or updating the plug-in directly from Eclipse:
http://www.eclipse.org/subversive/documentation/gettingStarted/aboutSubversive/install.php
http://www.eclipse.org/subversive/documentation/gettingStarted/aboutSubversive/update_eclipse.php- More doc: http://www.ibm.com/developerworks/library/os-ecl-subversion/
Following the instructions, Eclipse JEE is downloaded from the site as a .zip file (on Windows). Opened by File Explorer, the zip reveals one subdirectory, eclipse, which is dragged to the root of the C: drive (typically). Launch that, select a workspace (mine is C:\russ\workspace) and then follow the instructions for add Subversion integration.
The Subversion integration is done via the Help->Software Updates->Find and Install... feature. The instructions are clear enough except for three things. First, careful attention must be paid to the path to put in for the update URL: it is not the path http://www.eclipse.org/subversive/downloads.php, instead that's where you go to get the path for the plug-in and for the Subversive SVN Connectors update site, respectively:
- http://download.eclipse.org/technology/subversive/0.7/update-site/
- http://www.polarion.org/projects/subversive/download/eclipse/2.0/update-site/

Second, the doc speaks of creating an update feature named Subversive SVN Connectors, but then clearly illustrates it being called Subversive Clients. I stayed with the first and pretended the illustrations were done with that name instead of the other. I think it's not wrong to call them clients, but the first name does match what's being done.
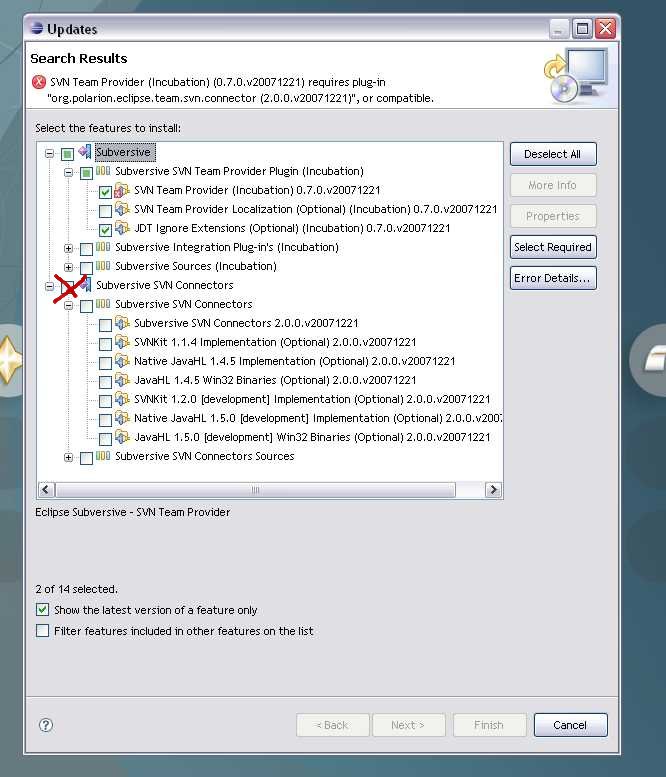
Third, once you get to clicking Next and finished, you may end up with an apparent error to the effect that some plug-in is required as illustrated here to the right. This is solved by simply clicking on the check box next to Subversion SVN Connectors where I've scrawled a big red X.
Now that Eclipse and Subversion Are Set Up
In Eclipse open the SVN Repository Explorer Window->Open Perspective->Other...->SVN Repository Explorer.
Create a repository location by clicking on the icon of a yellow cylinder with a green +. The URL to use, from our source code checked in a while back is http://www.windofkeltia.com/svn/DesignPatterns. Add username and password of your svn credentials. Once created, you should be able to browse the repository from there.
Then, back at the filesystem (outside of Eclipse), create a directory and check out the trunk. For command-line and GUI tools on Windows (your Linux distro probably already has them at the ready, if not, use Yast, apt, etc.), see
- Command-line (from tigris.org—what I'm using)
- GUI (Tortoise SVN from sourceforge.net)
The workspace directory is merely a directory for Eclipse to store relevant settings for a logical set of projects. The workspace may or may not include the projects themselves. You should checkout the trunk into another directory because when you import from that directory Eclipse will pick up the separate project files you have checked in and set things up for you. You could checkout directly from within Eclipse into the workspace itself, but when you do, you only create one project that has all of the sub-directories underneath—not multiple projects, but just one. This isn't what you want to do.
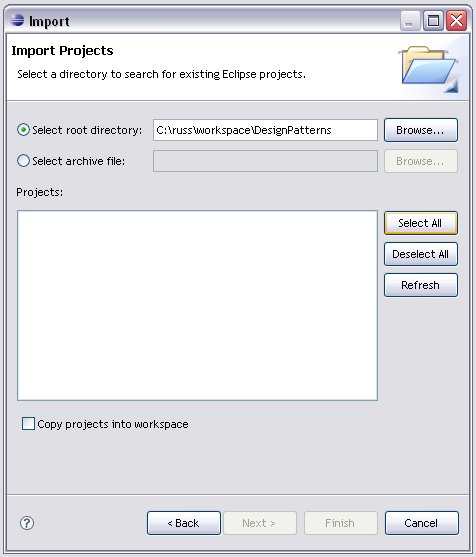
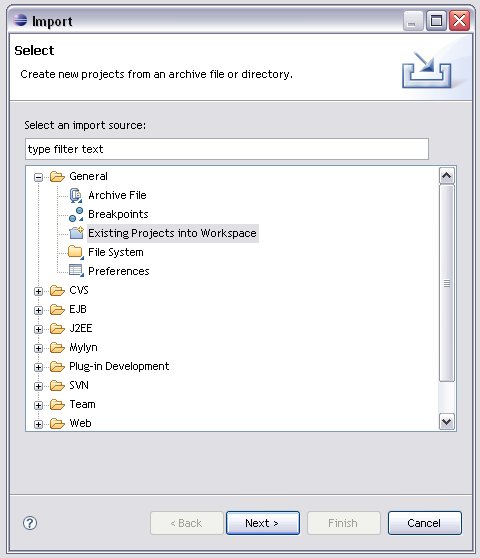
Finally, in Eclipse, open the Java perspective and right-click in the Package Explorer and select Import->General->Existing Projects into the workspace directory. In Select Root Directory, browse to the directory where you checked out the trunk. A list of projects should show. Make sure Copy projects into workspace is NOT checked. See next two illustrations.


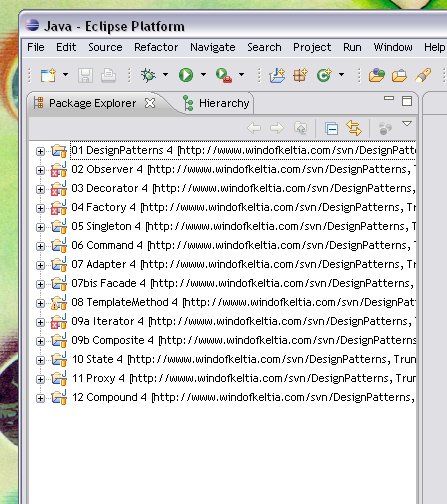
After a few moments, you will have a list of projects showing the repository and version for each project. (See illustration to the right.)
Appendix A: a Source Code Tree
Here's my project tree (I'm listing from SuSE Linux):
	gadfly@windofkeltia:~/DesignPatterns> tree
	/home/gadfly/DesignPatterns
	   .
	   |-01 Strategy
	   |---src
	   |-----hfdp
	   |-------strategy
	   |---------1.19
	   |-02 Observer
	   |---src
	   |-----hfdp
	   |-------observer
	   |---------2.61
	   |---------2.69
	   |-03 Decorator
	   |---src
	   |-----hfdp
	   |-------decorator
	   |---------3.103
	   |---------3.98
	   |-04 Factory
	   |---src
	   |-----hfdp
	   |-------factory
	   |-05 Singleton
	   |---src
	   |-----hfdp
	   |-------singleton
	   |-06 Command
	   |---src
	   |-----hfdp
	   |-------command
	   |-07 Adapter
	   |---src
	   |-----hfdp
	   |-------adapter
	   |-07bis Facade
	   |---src
	   |-----hfdp
	   |-------facade
	   |-08 TemplateMethod
	   |---src
	   |-----hfdp
	   |-------templatemethod
	   |-09a Iterator
	   |---src
	   |-----hfdp
	   |-------iterator
	   |-09b Composite
	   |---src
	   |-----hfdp
	   |-------composite
	   |-10 State
	   |---src
	   |-----hfdp
	   |-------state
	   |-11 Proxy
	   |---src
	   |-----hfdp
	   |-------proxy
	   |-12 Compound
	   |---src
	   |-----hfdp
	   |-------compound
Appendix B: Ganymede Update
For Ganymede, things are a little different. Before importing any projects into Eclipse 3.4 (Ganymede), be sure to read and execute the steps covered by Raymond's blog.